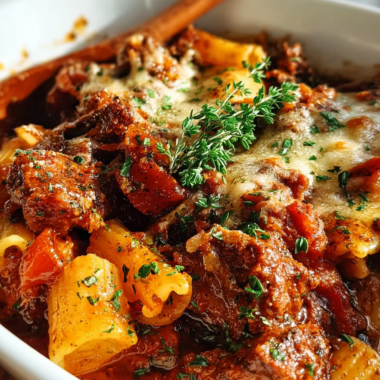

Imagine sinking your teeth into golden-brown Baked Artichoke Hearts, where the tender morsels are infused with garlicky goodness and a melty blanket of cheese that oozes with every bite. The aroma wafts through the air, inviting everyone to gather around and savor this delightful dish that promises a mouthwatering experience full of flavor and comfort. This recipe is a cherished favorite in my home, perfect for gatherings, game days, or a cozy night in.
Why This Baked Artichoke Hearts: Cheesy and Irresistible Goodness Recipe Works
This Baked Artichoke Hearts recipe stands out for its incredible texture and flavor profile. The combination of crispy breadcrumbs and gooey cheese creates a delightful contrast that elevates the dish to a whole new level. By opting for fresh artichoke hearts and high-quality cheese, you ensure that every bite is packed with flavor and satisfaction.
One of the best aspects of this recipe is its simplicity and speed. With just a few ingredients and quick prep time, you can whip up a delicious appetizer that will have your guests raving.
- Quick prep time: Ready in under 30 minutes.
- Rich flavor: A blend of cheeses adds depth and creaminess.
- Crispy topping: Breadcrumbs create a perfect crunchy layer.
- Versatile: Great as an appetizer, side dish, or snack.
- Customizable: Easily adapt to your personal taste or dietary needs.
Expert Tips for the Best Baked Artichoke Hearts: Cheesy and Irresistible Goodness
Use Fresh Artichoke Hearts: Fresh artichoke hearts provide a superior taste compared to canned ones. Look for artichokes that are firm and have a bright color.
Cheese Selection Matters: Combining cheeses like mozzarella and Parmesan gives the best melt and flavor combination. Aim for about 1 cup of cheese for perfect cheesiness.
Don’t Skimp on Seasoning: Adding garlic powder, salt, and pepper enhances the flavor. A teaspoon of garlic powder can make a significant difference.
Perfect Oven Temperature: Bake at 375°F (190°C) for 25 minutes. This temperature ensures the cheese melts perfectly while allowing the breadcrumbs to crisp up.
Check for Doneness: Look for a golden-brown topping. If it’s not browned enough, broil for an additional 2-3 minutes at the end of baking.
Avoid Overcrowding: Spread the artichoke mixture evenly in the baking dish. This ensures even cooking and crispiness.
Let Them Rest: Allow your baked artichoke hearts to sit for 5 minutes after baking. This helps the cheese set a bit, making them easier to serve.

Variations and Substitutions
- Dairy-Free Option: Substitute cheese with dairy-free cheese alternatives to make it vegan-friendly.
- Gluten-Free Version: Use gluten-free breadcrumbs instead of regular ones for a gluten-free dish.
- Air Fryer Method: Cook at 375°F (190°C) for 15-18 minutes for a quicker, crispy version.
- Instant Pot Variation: Steam artichoke hearts in the Instant Pot for 5 minutes before baking for enhanced tenderness.
- Spicy Kick: Add red pepper flakes or jalapeños to the mixture for a spicy twist.
How to Store and Reheat Baked Artichoke Hearts: Cheesy and Irresistible Goodness
Store any leftovers in an airtight container in the refrigerator for up to 3 days. If you want to keep them longer, you can freeze them for up to 3 months. Just ensure they are fully cooled before freezing.
To reheat, the best method is using the oven. Preheat your oven to 350°F (175°C) and bake for about 10-15 minutes, or until heated through. If you’re in a hurry, you can use the microwave, but this might result in a softer texture.
What to Serve with Baked Artichoke Hearts: Cheesy and Irresistible Goodness
These Baked Artichoke Hearts pair perfectly with a simple garlic bread, making for a delightful starter. They also complement a crisp salad, giving a fresh contrast to the richness of the dish. For a heartier meal, serve alongside baked chicken recipes or baked salmon recipes for a filling dinner experience. And if you’re looking for something comforting, a side of baked mac and cheese recipe is always a crowd-pleaser.

Easy Baked Artichoke Hearts: Cheesy and Irresistible Good…
Course: Main CourseCuisine: AmericanDifficulty: Easy4
servings15
minutes30
minutes350
kcalIngredients
Directions
- Preheat the oven to 375°F (190°C).
- Combine the ingredients in a mixing bowl.
- Transfer the artichoke mixture to a baking dish.
- Mix the topping ingredients in a small bowl.
- Sprinkle the bread crumb mixture over the artichoke layer.
- Bake in the preheated oven for 25 minutes.
- Cool slightly before serving.
Frequently Asked Questions
Can I make Baked Artichoke Hearts: Cheesy and Irresistible Goodness ahead of time?
Yes, you can prepare the mixture ahead of time and store it in the refrigerator. Just bake them fresh when you’re ready to serve for the best flavor and texture.
How long does Baked Artichoke Hearts: Cheesy and Irresistible Goodness last in the fridge?
They will last in the refrigerator for up to 3 days. Make sure to store them in an airtight container to maintain freshness.
Can I freeze Baked Artichoke Hearts: Cheesy and Irresistible Goodness?
Absolutely! They freeze well for up to 3 months. Just ensure they are completely cooled before placing them in a freezer-safe container.
What can I use instead of breadcrumbs for Baked Artichoke Hearts?
You can use crushed crackers or panko for a different texture. For a gluten-free option, consider using almond flour or gluten-free breadcrumbs.
Can I add meat to Baked Artichoke Hearts: Cheesy and Irresistible Goodness?
Yes! Adding cooked bacon or shredded chicken can elevate the flavor and make it a heartier dish. Just fold the meat into the artichoke mixture before baking.