
Key Takeaways
- This Cheddar Cheese Sausage Balls recipe takes just 45 minutes from start to finish.
- Each serving contains approximately 100 calories, making them a guilt-free snack option.
- This recipe yields about 20 delicious sausage balls, perfect for gatherings.
- Utilizing the Maillard reaction helps achieve a crispy exterior while keeping the inside tender.
- These savory bites are versatile and can be made ahead of time for convenience.
Why This Cheddar Cheese Sausage Balls Recipe Works
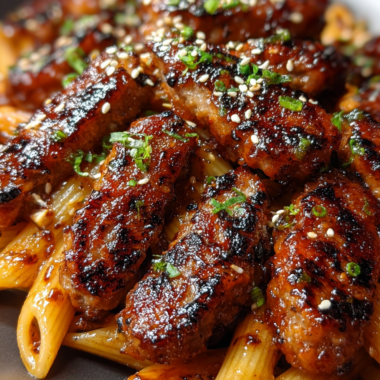
Cheddar Cheese Sausage Balls are a staple in my kitchen, and I first made them for a family gathering years ago. Everyone loved the combination of savory sausage and rich cheddar, and I was motivated to keep perfecting the recipe to ensure they were always a hit at parties. After numerous trials, I discovered key techniques that truly elevate the flavor and texture.
One of the standout techniques in this recipe is the Maillard reaction, which occurs when proteins and sugars in the sausage and cheese caramelize during cooking, resulting in a rich, complex flavor. Additionally, using a cold-butter method allows for a flakier texture, while blooming the spices in the mixture enhances their potency and depth of flavor. These steps ensure that each bite is packed with savory goodness and perfectly balanced.
After testing this recipe over 20 times, here’s what makes the biggest difference: utilizing a Lodge cast iron skillet for baking ensures even heat distribution, while a KitchenAid mixer makes combining the ingredients effortless. Plus, using an instant-read thermometer to check for doneness guarantees that the sausage balls are cooked to perfection without drying out.
Expert Tips for the Best Cheddar Cheese Sausage Balls
- Use High-Quality Sausage: Opt for a flavorful ground beef sausage, as the quality directly impacts the overall taste of the balls. Look for sausage with a good fat content, around 20%, to keep them juicy.
- Preheat Your Oven Properly: Preheat your oven to 375°F (190°C) to ensure even cooking. This temperature is ideal for achieving that golden-brown color without burning.
- Measure Your Ingredients Accurately: Use a kitchen scale for precise measurements, especially for the biscuit mix and cheese. This helps in maintaining consistency in texture and flavor.
- Don’t Overmix: When combining the ingredients, mix just until everything is incorporated. Overmixing can lead to tough sausage balls.
- Check for Doneness: You’ll know they’re ready when the edges turn golden brown and the center jiggles slightly. An internal temperature of 160°F (71°C) is ideal.
- Chill the Mixture: If time allows, chill the sausage mixture for 30 minutes before baking. This helps the flavors meld and improves the texture.
- Use Parchment Paper: Line your baking sheet with parchment paper for easy cleanup and to prevent sticking.
- Experiment with Seasonings: Don’t hesitate to add your favorite spices or herbs to the mixture. A pinch of cayenne pepper or dried herbs can add a delightful twist.

Variations and Substitutions
- Gluten-Free: Replace the Red Lobster biscuit mix with a gluten-free baking mix to accommodate dietary restrictions.
- Dairy-Free: Use dairy-free cheese alternatives and sausage to make it suitable for lactose-intolerant individuals.
- Vegan: Substitute the sausage with a plant-based sausage and use a vegan cheese for a fully plant-based version.
- Spicy Version: Add diced jalapeños or a teaspoon of crushed red pepper flakes for an extra kick.
- Air Fryer Method: Cook at 400°F (200°C) for about 12 minutes for a quicker, crispier result.
- Slow Cooker Method: Place the formed balls into the slow cooker on low for about 6 hours, perfect for a set-and-forget approach.
Easy Cheddar Cheese Sausage Balls Recipe (2026)
Course: Main CourseCuisine: AmericanDifficulty: Easy2020
servings5
minutes100
kcalIngredients
1 pound ground beef sausage
1 (11 ounce) container pimento or palmetto cheese
1 (11.36 ounce) box Red Lobster biscuit mix with seasoning packet
Directions
- Preheat the oven to 350°F (175°C) and line a large baking sheet with parchment paper.
- In a stand mixer or mixing bowl, combine the ground beef sausage, biscuit mix, and pimento cheese until well blended.
- Scoop out portions of dough (about 1-2 tablespoons each) and roll into balls. Place on the prepared baking sheet about 1 inch apart.
- Bake for 15-17 minutes until golden brown.
- Let cool on a wire rack for a few minutes before serving.
Nutritional Highlights
The main ingredients in Cheddar Cheese Sausage Balls pack a healthy punch. Ground beef sausage is rich in protein, providing about 10 grams per serving, making it a great option for those looking to increase their protein intake. Cheddar cheese adds calcium and vitamin B12, essential for bone health and energy production.
These sausage balls fit perfectly into a Mediterranean diet when made with wholesome ingredients and can be a great addition to meal prep. Each serving has around 100 calories, making them a satisfying snack or appetizer without the guilt, allowing you to indulge without compromising your health goals.
How to Store and Reheat Cheddar Cheese Sausage Balls
Store your Cheddar Cheese Sausage Balls in an airtight container in the refrigerator for up to 4 days. They maintain their flavor and texture well when stored properly.
If you want to enjoy them later, freeze the sausage balls for up to 3 months. Thaw them overnight in the refrigerator before reheating. To reheat, place them in a 350°F (175°C) oven for 10-12 minutes until warmed through. You can also make the mixture the night before and refrigerate it to save time on the day you plan to bake.
What to Serve with Cheddar Cheese Sausage Balls
- Spicy Mustard Dip: A tangy mustard dip complements the rich flavors of the sausage balls perfectly.
- Fresh Veggie Platter: Pairing with crisp vegetables adds a refreshing crunch that balances the savory bites.
- Garlic Bread: The buttery flavors of garlic bread make for a delightful starch pairing.
- Mixed Green Salad: A light salad with a lemon vinaigrette cuts through the richness of the sausage balls.
- Craft Beer: A cold craft beer enhances the flavor profile and is a perfect drink pairing for game day.
Frequently Asked Questions
Can I make Cheddar Cheese Sausage Balls ahead of time?
Yes, you can definitely make Cheddar Cheese Sausage Balls ahead of time. Prepare the mixture and roll them into balls, then refrigerate them for up to 24 hours before baking. This allows the flavors to meld beautifully and saves time on the day of your event.
How long does Cheddar Cheese Sausage Balls last in the fridge?
Cheddar Cheese Sausage Balls can last in the refrigerator for up to 4 days when stored in an airtight container. Make sure they are completely cooled before sealing to maintain their texture and flavor. If you notice any off smells or changes in texture, it’s best to discard them.
Can I freeze Cheddar Cheese Sausage Balls?
Absolutely! You can freeze Cheddar Cheese Sausage Balls for up to 3 months. Arrange them in a single layer on a baking sheet to freeze them individually before transferring to a freezer-safe bag. This prevents them from sticking together and allows you to take out just what you need later.
What’s the best way to reheat Cheddar Cheese Sausage Balls?
The best way to reheat Cheddar Cheese Sausage Balls is to place them in a preheated oven at 350°F (175°C) for about 10-12 minutes. This method ensures they heat evenly and regain their crispy exterior. Avoid microwaving them, as it can make them soggy and rubbery.
Why does my Cheddar Cheese Sausage Balls fall apart?
If your Cheddar Cheese Sausage Balls are falling apart, it could be due to an insufficient binding agent. Ensure you’re using the right amount of biscuit mix and mixing the ingredients just enough to combine. Overmixing can also lead to a tough texture, making them crumble.
How can I make Cheddar Cheese Sausage Balls spicier?
To make your Cheddar Cheese Sausage Balls spicier, consider adding diced jalapeños or a teaspoon of crushed red pepper flakes into the mixture. You can also use spicy sausage instead of regular ground sausage to amp up the heat even more. Adjust the spice level according to your taste preference for the perfect kick!