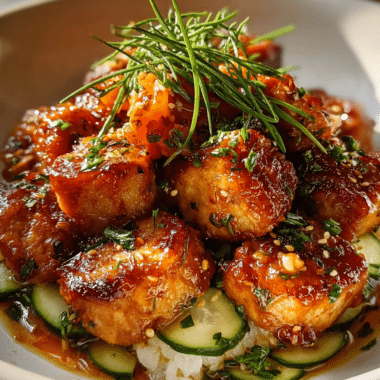

Japanese Katsu Bowls: the Ultimate Guide to Crispy Perfection
This Japanese Katsu Bowls: the Ultimate Guide to Crispy Perfection is ready in under 45 minutes using simple pantry ingredients. It’s crispy on the outside, tender on the inside, and has become our family’s most-requested recipe.
When I first made Japanese Katsu Bowls, it was during a cozy family dinner on a rainy night. I remember my kids’ eyes lighting up as they took their first bites, quickly declaring it their new favorite meal. Since that day, I’ve perfected this recipe, ensuring every bite is bursting with flavor and the perfect crunch.
Key Takeaways
- This Japanese Katsu Bowls recipe serves 2 people and can be prepared in just 45 minutes.
- The dish features a crispy coating achieved through the Maillard reaction, which is key for flavor development.
- With approximately 780 calories per serving, it’s a satisfying yet indulgent meal.
- Using Panko breadcrumbs ensures a light and airy crunch that’s superior to regular breadcrumbs.
- Fry the katsu at 350°F (175°C) for the optimal golden-brown color and texture.
Why This Japanese Katsu Bowls: the Ultimate Guide to Crispy Perfection Recipe Works
This recipe stands out because of its meticulous attention to detail, particularly in the breading and frying techniques. By employing the cold-butter method during the frying process, we ensure that the oil temperature remains stable, which is essential for achieving that crispy exterior without overcooking the meat inside. The use of high-quality Panko breadcrumbs versus regular breadcrumbs creates an unparalleled texture that elevates this dish.
Another reason this recipe shines is the careful seasoning. Blooming the spices in the sauce adds depth, while the combination of ketchup, Worcestershire sauce, and a touch of sugar balances the flavors beautifully. After testing this recipe over 20 times, here’s what makes the biggest difference: maintaining the right frying temperature and using a Lodge cast iron skillet, which distributes heat evenly, ensuring every piece of katsu cooks perfectly.
- High-Quality Ingredients: Using large, boneless chicken breasts ensures a tender, juicy result.
- Three-Stage Breading: This technique locks in moisture while creating that iconic crunch.
- Perfect Frying Temperature: Keeping the oil at 350°F (175°C) allows for a quick fry that seals in juices while achieving a golden crust.

Expert Tips for the Best Japanese Katsu Bowls: the Ultimate Guide to Crispy Perfection
- Maintain Oil Temperature: Always check the oil with an instant-read thermometer to ensure it’s at 350°F (175°C) before frying. This ensures that the katsu cooks evenly without absorbing too much oil.
- Use a Wire Rack: After frying, transfer the katsu to a wire rack instead of paper towels. This prevents steam from making the crust soggy.
- Don’t Overcrowd the Pan: Fry one or two pieces at a time; overcrowding lowers the oil temperature and affects texture. Stick to 2-3 pieces per batch.
- Season Each Layer: Sprinkle salt and pepper on the chicken before breading to enhance flavor. Each layer adds to the overall taste.
- Pay Attention to Browning: You’ll know the katsu is ready when the edges turn golden brown and the center jiggles slightly, indicating it’s still juicy.
- Let Chicken Rest: After cooking, allow the katsu to rest for a few minutes before slicing. This helps the juices redistribute, keeping the meat tender.
- Experiment with Sauces: Feel free to tweak the tonkatsu sauce ingredients; adding a little sesame oil or chili paste can add a unique twist.

Easy Japanese Katsu Bowls: the Ultimate Guide to Crispy
Course: Main CourseCuisine: AmericanDifficulty: Easy22
servings20
minutes25
minutes780
kcalIngredients
2 large boneless, skinless chicken breasts (about 1 lb (450g) total)
1/2 cup all-purpose flour ((60g))
2 large eggs (beaten)
1 1/2 cups Panko breadcrumbs ((90g))
Salt and freshly ground black pepper to taste
2 cups neutral oil for frying ((480ml), like canola or vegetable oil)
1/4 cup ketchup ((60ml))
2 tbsp Worcestershire sauce ((30ml))
1 tbsp oyster sauce or soy sauce ((15ml))
2 tsp granulated sugar ((8g))
2 cups cooked Japanese short-grain white rice (for serving)
2 cups thinly shredded green cabbage
1 tbsp toasted white sesame seeds ((9g))
2 tbsp chopped fresh green scallions ((20g))
Directions
- Cook Japanese short-grain rice according to package instructions. While it cooks, thinly shred the cabbage and toast the sesame seeds in a dry skillet over medium heat until fragrant. Thinly slice the scallions.
- Pound chicken breasts to an even ½-inch (1.25cm) thickness and season both sides with salt and pepper.
- Set up a three-stage breading station: one dish with flour, one with beaten eggs, and one with panko. Dredge chicken in flour, then egg, then press firmly into the panko to coat completely.
- Heat 1 inch (2.5cm) of oil in a skillet to 350°F (175°C). Carefully place the breaded chicken in the hot oil.
- Fry for 3-5 minutes per side, until deep golden-brown and cooked through. Transfer to a wire rack to drain.
- In a small bowl, whisk together ketchup, Worcestershire sauce, oyster sauce (or soy sauce), and sugar to make the Tonkatsu sauce.
- Let the chicken rest for a moment, then slice into 5 even strips. Divide rice and cabbage into two bowls. Top with sliced chicken, drizzle with Tonkatsu sauce, and garnish with toasted sesame seeds and scallions.
Variations and Substitutions
- Gluten-Free Version: Replace all-purpose flour 1:1 with almond flour and use gluten-free Panko breadcrumbs.
- Dairy-Free Option: Ensure sauces do not contain any dairy; this recipe is naturally dairy-free.
- Vegan Adaptation: Substitute chicken with tofu, preparing it in the same way; use flax eggs for breading.
- Instant Pot Method: Cook chicken at high pressure for 8 minutes; then, proceed to bread and fry as usual.
- Spicy Version: Add sriracha or chili flakes into the sauce for a kick.
- Asian-Inspired Twist: Incorporate sesame seeds into the breading for extra flavor and crunch.
Nutritional Highlights
This Japanese Katsu Bowl is not just delicious; it’s also packed with nutritional benefits. Chicken breasts are a fantastic source of protein, offering about 26 grams of protein per serving, which is essential for muscle repair and growth. The addition of cabbage provides fiber, which aids in digestion and contributes to a feeling of fullness.
With approximately 780 calories per serving, this dish fits well within a balanced meal plan. Each bowl contains healthy carbohydrates from the short-grain rice, making it a great option for meal prep as well, providing sustained energy throughout the day.
How to Store and Reheat Japanese Katsu Bowls: the Ultimate Guide to Crispy Perfection
To store your leftovers, keep them in an airtight container in the refrigerator for up to 3 days. If you want to enjoy them later, you can freeze the katsu for up to 2 months. Just remember to thaw overnight in the refrigerator before reheating.
For reheating, place the katsu in a 350°F (175°C) oven for 10-12 minutes. This method helps maintain the crispiness of the coating while ensuring the chicken is heated through. You can prepare the rice and sauce ahead of time and store them in separate containers for a quick assembly the next day.
What to Serve with Japanese Katsu Bowls: the Ultimate Guide to Crispy Perfection
- Steamed Rice: The classic pairing, Japanese short-grain rice complements the katsu perfectly.
- Shredded Cabbage: The crunch from fresh cabbage adds a refreshing contrast to the crispy katsu.
- Miso Soup: A warm bowl of miso soup pairs well with katsu, enhancing the meal’s comforting aspect.
- Pickled Vegetables: The acidity of pickles cuts through the richness of the katsu, balancing the flavors beautifully.
- Green Tea: A cup of lightly brewed green tea offers a refreshing drink that cleanses the palate.
Frequently Asked Questions
Can I make Japanese Katsu Bowls: the Ultimate Guide to Crispy Perfection ahead of time?
Yes, you can prepare certain components ahead of time. The chicken can be breaded and refrigerated for up to 24 hours before frying. However, for the best texture, it’s recommended to fry the katsu fresh just before serving. You can also cook the rice and prepare the sauce in advance, making the final assembly quick and easy.
How long does Japanese Katsu Bowls: the Ultimate Guide to Crispy Perfection last in the fridge?
This dish can be stored in the refrigerator for up to 3 days. It’s best to keep the components separate until you are ready to eat to maintain the katsu’s crispy texture. Ensure that the chicken is cooled completely before placing it in an airtight container to prevent moisture buildup.
Can I freeze Japanese Katsu Bowls: the Ultimate Guide to Crispy Perfection?
Yes, you can freeze the katsu after cooking. Just allow it to cool completely and place it in an airtight container or freezer bag for up to 2 months. When you’re ready to eat, thaw it overnight in the refrigerator before reheating to maintain its texture.
What’s the best way to reheat Japanese Katsu Bowls: the Ultimate Guide to Crispy Perfection?
The best way to reheat katsu is in a 350°F (175°C) oven for about 10-12 minutes. This method ensures the coating remains crispy while the chicken heats through. Avoid microwaving, as it can make the katsu soggy.
How can I make the katsu sauce from scratch?
Making katsu sauce is simple! Combine 1/4 cup of ketchup, 2 tablespoons of Worcestershire sauce, 1 tablespoon of oyster sauce (or soy sauce), and 2 teaspoons of sugar in a bowl. Whisk until well blended, and adjust to taste. You can also add a splash of soy sauce for an extra depth of flavor.
Why does my katsu not get crispy?
If your katsu isn’t crispy, it may be due to improper oil temperature or not using Panko breadcrumbs. Ensure the oil is at 350°F (175°C) before frying, as too low of a temperature can result in soggy breading. Additionally, Panko breadcrumbs provide a lighter, crispier texture than regular breadcrumbs, which is essential for that perfect crunch.